Sunday, October 30, 2011

How to Add AdMob to Your App

AdMob is a service for developers that provides advertisements for your apps.  If you've used Android for any amount of time, I'm sure you know that many apps are monetized through small ads displayed in the app.  So the question is, how can you get your own piece of the mobile ad pie?  Well, I'm about to tell you.
  1. First you'll need to make sure you've got the latest version of the Android SDK.
  2. Next, you need to download the AdMob SDK.  Inside of the zip file, you'll find a .jar file.  Copy that to the libs folder under your project root.
  3. Now go to your project in Eclipse.  Right click your project in the package explorer and choose refresh to make sure the jar is showing up in your libs folder.
  4. Next we need to add the library to the project.  To do this, right click your project and go to properties.  Then go to "Java Build Path" on the left and then choose the "Libraries" tab.  Now click "Add JARs..." and you should see the GoogleAdMobAdsSdk jar file inside of your project.  Select that and click OK until you're back to the editor.
  5. Next we need to add an AdActivity to our AndroidManifest.xml file.  Put this at the bottom of the application section, just before </application>.
    <activity android:name="com.google.ads.AdActivity"
    android:configChanges="keyboard|keyboardHidden|orientation|screenLayout|uiMode|screenSize|smallestScreenSize"/>
  6. You also need to set the permissions to access the Internet and the Network State.  Obviously, these are required to download the ads.  This should be pasted at the end of your AndroidManifest.xml right before the </manifest> tag.
    <uses-permission android:name="android.permission.INTERNET"/>
    <uses-permission android:name="android.permission.ACCESS_NETWORK_STATE"/>
  7. Now it's time to add the ad to your application.  The library we included comes with a new view called an AdView.  Let's add this to our layout through XML.  Open the main layout xml file for your project.  In this example, we'll use a linear layout.  We'll begin by adding the namespace (the xmlns:ads="http://..." part) to the LinearLayout as shown below.
    <LinearLayout android:id="@+id/linearLayout1"
            android:orientation="vertical"
            android:background="#FFFFFF"
            android:layout_height="fill_parent"
            android:layout_width="fill_parent"
            xmlns:android="http://schemas.android.com/apk/res/android"
            xmlns:ads="http://schemas.android.com/apk/lib/com.google.ads">
  8. Now go to the bottom of the LinearLayout and add the AdView code shown below.  Remeber to insert your publisher id into the adUnitId field.
    
    
  9. The last tricky part is to use wrap_content for your ad height and then set the main view element to a height of 0px and weight of 1.  This will make the AdView size to the banner ad size and then will allow your main content to take up the remaining space.  In my project, I had a linear layout that was set to fill_parent.  Inside of that I had a fragment with a height of 0px and weight of 1 followed by the AdView with a height of wrap_content.
That's it!  You should now be well on your way to becoming a mobile app mogul.
One thing to look out for for those of you that are running a custom mod on your phone is the etc/hosts file.  Many mods include a list of ad domains that are blocked through the hosts file.  This is great if you don't like seeing ads, but can be a problem when it comes time to test ads in your app.  I used notepad++ and a find/replace with a regular expression like the one below.
Find:
(.*admob.*)
Replace:
# \1
This will comment out all of the admob lines.  I also did it with a search for google instead of admob.

To get your admob ad unit id go to your admob account and click on Sites & Apps and then click the manage button underneath the app you are working with. You'll see the Publisher ID for the app on the details page. This is the Ad Unit ID.


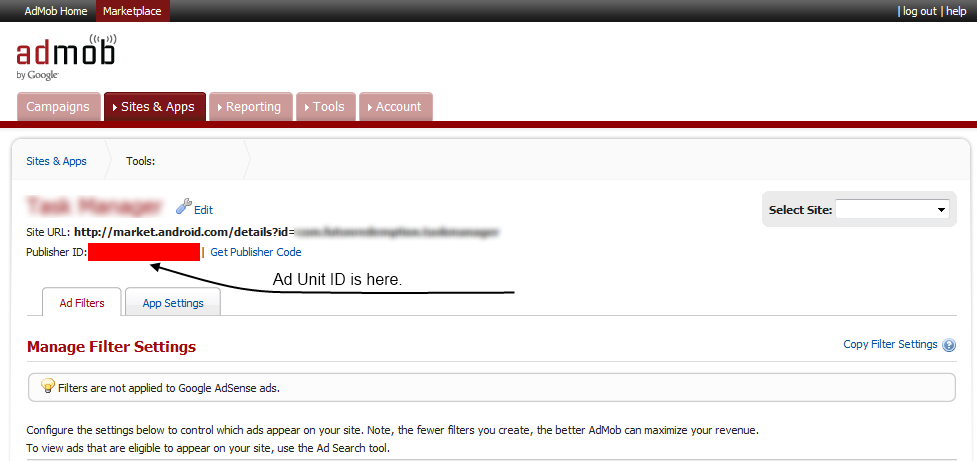
Admob Administration page for an app.

Tuesday, October 25, 2011

Tip: Choosing a Color Palette/Theme

Many Android apps out there don't look that well. While it's not impossible to make a great looking app. It's difficult if you're a lone developer with little designer skills. 


A big reason why developers (without design sense) make poor looking apps is because it's difficult to get a consistent color theme. In short, developers suck at picking colors. This shouldn't discourage you though. A great way to overcome this problem is to have other people that are good at picking colors do it for you, for free.


There's a site called Colour Lovers which has been indispensable as a tool for finding a good color themes. Try to stick with a clean palette of 3-5 colors (+ black and white) and use only those colors throughout the application.


Of course you'll want to tag these colors as color resources in your app.

http://www.colourlovers.com/


Android Color Palette (http://www.colourlovers.com/palette/1392493/Android)


res/colors_palette.xml

    #ff464D5C
    #ffA4C639
    #ffD1E29C
    #ffE4EBCE
    #ffF0F0F0


Of course when referencing color resources in xml use the @color/name syntax.

Monday, October 24, 2011

Android Asset Studio

A lot of Android developers don't have designers working with them to make their apps look as great as they're built. Following the Android User Interface Guidelines is important to make an app feel like it fits in naturally with the rest of the OS. A great tool to help with this is the Android Asset Studio.


Asset Studio takes basic vector shapes, clip art, and so on and makes icon resources that follow the guidelines. It works pretty well and is being actively developed by Google engineers.


It supports Launcher, Menu, Action Bar, Tab and Notification icons as well as placing screenshots into phone frames.


Asset Studio - Launcher Icon Generator
UPDATE: Some of these features made their way into the Android Eclipse plugin. The web app still have more features in it though. You can access it by right clicking your project in the Package Explorer view's and selecting New -> Other. Then drill down to Android Icon Set. 


Sunday, October 23, 2011

Creating Activities for Tablets and Phones

Most apps start with the launcher icon. Activities that are specified with the following intent-filter will have a launcher icon for them.


There's a lot of Android hardware out there. The most notable form factors are phones and tablets. In Android 3.0 Fragments were introduced as a solution to compartmentalize logic so that it can be easier to share between phones and tablets. Fragments are great but having 1 Activity to work with phones and tablets is difficult to maintain.


The cleanest solution is to have separate activities for phones and tablets and use bool resources to tell Android which activity to use. Notice that the booleans are true based where they are stored, we assume phones but xlarge displays usually indicate tablets. Then in the AndroidManifest.xml we have the 2 activities declared where the android:enabled is based on which mode the app is going to run in.


This solution isn't limited to Tablets vs Phones. You can basically create conditionals as the resource folder qualifiers allow.


res/values/bools_hardware.xml

    true
    false
res/values-xlarge/bools_hardware.xml

    false
    true

AndroidManifest.xml


Android Starter Kit Part 1

I have a year of Android development experience. Which in framework years means I’m old enough climb up on the kitchen counter, take mom’s keys out of the cookie jar and buy over-the-counter whiteout.

Android, like any platform, has a learning curve. There are so many things to learn it can be overwhelming. Android’s main classes are probably the hardest to understand. Once you get over this hump it’s smooth sailing and there’s a constant draft.

Through experience grinding, I’ve found some tips that make everything a lot easier. Some of these were surprising. And others are fun. Below I compiled an Android Starter Kit. I made it from items dropped by Exceptions.


0. Take a Coffee Break (If you need it)
Java is the language you’ll be using in Android. You have to know it. Get some beans before you proceed any further. C#ers take note, Java is similar to C#. In fact, I learned C# by writing Java code in Visual Studio and fixing the compile errors.

1. Learn the Basics of Your Environment
Go to developer.android.com download all the goodies. Install, configure, setup your virtual device etc.

Create and launch the virtual device (AVD). I recommend using the latest Android version with the Google API for now. It’s the fastest. The AVD takes a long time to boot. So if you have OCD then go outside for a walk.

Lastly, leave all the acronyms you learned in school on the floor for a while, well except OOP. You’re code is going to be garbage and it had better be garbage. Focus on learning not perfection. Who says patterns make perfect anyway?

2. Get a REAL Android phone
Notice I didn’t say “device.” Get a phone, with or without contract with “stock firmware.” It’s important that you get real hardware because certain things don’t work in the emulator. For professionals, get at least 2. Both phones should be as opposite as possible. There’s so many of them out there and you can probably find one before your AVD finishes booting up. Here’s to REAL multiasking! And remember the best apps can only be written using the best hardware.

3. Plug in and Charge Up!
One of the great things about Android it it has a very healthy development community. There’s a ton of resources out there to help. Use these to start you off.
- Google Account - You should have one if you have an Android phone. If not create one through Gmail you’ll need it to register with the Android Market. www.gmail.com
- Stack Overflow - You’ll have questions. They’ve already been answered here. If they haven’t ask it and it’ll be answered in day at the most. www.stackoverflow.com
- Blogs - Keep a list of blogs that post code. These will give you ideas and provide insight that you never thought about. http://android-developers.blogspot.com is the official Android Development blog.

4. Tune In

A picture is worth a thousand words and that’s a lot to take in on one bite. You could choke. Those crazy diagrams and schematics are explained by Android Engineers on YouTube. What’s great about this is that they go a bit further and explain things that you should be aware of. Like: Why does an Activity get killed when the screen rotates? Good luck reading about that. I saw someone explain it to me in motion and I leveled up.

YouTube Channels:
AndroidDevelopers - http://www.youtube.com/user/androiddevelopers
GoogleDevelopers - http://www.youtube.com/user/googledevelopers
Oh and watch all the Google IO videos about Mobile and Android - http://code.google.com/events/io

Watching the videos takes a long time. Watch them at a leisurely pace. I suggest watching the important ones that are most relevant to you at the time and make room for the others as you have time.


At this point there’s plenty to do. Remember, don’t focus on code. Try to understand the concepts and how things work with Androids. Even if you know Java. Also be on the look out for classes the rhyme with Intent and Activity.

How to use ActionBar Sherlock

Note: ActionBarSherlock has changed significantly since the time of this posting. We will update this post as soon as we can, but in the mean time, please refer to the official documentation at http://actionbarsherlock.com/usage.html


  The Android ActionBar is a new widget that replaces the title bar, provides a location for menus and buttons, and provides a source of commonality between Android apps. The Action Bar is included by default in all activities that target Android 3.0 or greater, but in order to get the same effect in earlier versions of android, you were stuck writing a custom solution. ActionBar Sherlock is a nice library that allows you to solve this problem by letting you add ActionBars to your apps all the way back to Android 1.6. When used on Honeycomb and later it uses the default Android classes but on earlier versions it provides a custom replacement that still maintains compatibility with the newer API.

Here's a run down on how to add the library to your project. Note that since ActionBar Sherlock is an extension of the compatibility support library, you should remove the combatibility support jar if you were using it before since it is included with ActionBar Sherlock.

  1. Download the .zip/.tgz and extract it somewhere 
  2. Go to eclipse and choose File->New->Project 
  3. Choose Android Project 
  4. Select Create project from existing source and then browse to the library folder inside the folder you just extracted the .zip/.tgz into 
  5. Build Target should be the latest, but your minSdkVersion can be less 
  6. Finish the wizard, then right click on the newly created project and go to properties 
  7. Under the Android heading, you should see a section for Library with a checkbox IsLibrary. Make sure that's checked. 
  8. Now go to the properties for your Android project, then under the Android heading and the Library section choose Add... 
  9. You should see the actionbarsherlock library, add this to your project 
  10. Lastly, if you were using the compatibility support, you need to delete that jar since it's included in ActionBarSherlock After you have added the library to your project, you will need to take some additional steps to ensure it is being used.

1. Add a theme to your application in the AndroidManifest.xml

<application android:icon="@drawable/ic_launcher" android:label="@string/app_name"
 android:theme="@style/Theme.Sherlock">


2. Make sure that your activity extends FragmentActivity

public class AbbreviationsActivity extends FragmentActivity {


Now you're done! If you want to interact with your ActionBar through Java, make sure you use getSupportActionBar() instead of the standard getActionBar() to get the ActionBar Sherlock version of the action bar. The ActionBar Sherlock website along with the Android docs has information about theming, adding menus and buttons, and changing text and icons. Enjoy!