Sunday, February 26, 2012

Loading Bitmaps from the Gallery

A common intent to use is requesting a photo from the Gallery. The request itself is pretty easy. Here's the code.
final Intent intent = new Intent(Intent.ACTION_GET_CONTENT);
intent.setType("image/*");
intent.setFlags(Intent.FLAG_ACTIVITY_CLEAR_WHEN_TASK_RESET);
activity.startActivityForResult(intent, requestCode);
Getting the data back in Android 4.0 is almost just as simple, thanks to ContentProviders.
final InputStream is = context.getContentResolver().openInputStream(intent.getData());
final Bitmap imageData = BitmapFactory.decodeStream(is, null, options);
is.close();
This is kinda amazing considering that the Gallery does all sorts of complicated stuff to provide a good user experience as well as handling the management of the content itself. Remember, the gallery doesn't just handle Camera pictures, it pictures from other folders of the phone, albums from Picasa/Google+ and other pluggable data sources.

Unfortunately, if you support earlier versions you'll need to do more work because these abstractions weren't covered up as well back then. You'll need code for different Uri schemes that are returned from intent.getData().

  1. http:// or https:// - Download the file from the internet and read the file locally.
  2. file:// - Load the file via FileInputStream rather than the suggested getContentResolver.openInputStream.
  3. Complete garbage - Nothing you can do. The file failed to load, this can happen when the phone is low on memory, acting weird, data corruption, picture is too ugly, etc.
For a sample app doing the minimum is fine. For apps posted on the market there's a lot more things to handle before you can safely load the picture into memory...

Considerations for Robust Bitmap Loading:
  1. Code very defensively. You're reading user data which can be error prone. Catch exceptions when appropriate. Handle bad read permissions, handle network errors, and OutOfMemoryErrors. Lots of things can go wrong.
  2. Never load on the UI thread. It can take over 10 seconds to get the data if it isn't stored on the phone yet. Use AsyncTask. Tell the user that stuff is loading.
  3. Pictures can be large. Always check the size metrics before loading a graphic into memory. Use BitmapFactory.Options.inJustDecodeBounds. If the image file's metrics are too large then downsample the image using BitmapFactory.Options.inSampleSize.
  4. Bitmaps that have non-powers of 2 (NPOT) sizes are a bit troublesome for hardware accelerated views (relevant to Android 3.0 and higher). NPOT images can take up a lot more memory and the errors are subtle. Check Logcat if images aren't appearing. Try downsampling, resizing, or cropping the bitmap.
  5. In Android 3.0, images are loaded into Java-native byte arrays which means they count towards your VM budget. Android 2.3 and lower used native code memory which isn't tracked. This masked some memory load problems. Use Eclipse Memory Analyzer (MAT) to detect large bitmaps.
The sample code in this article is not enough for a robust implementation of loading bitmaps. It doesn't take into account all the considerations listed above. There's some code in the android-beryl project that does this for you. You'll want to checkout BitmapWrapper.create().

If you want a start-to-finish for handling the intent result of the gallery then look into, Gallery.java.

Beryl Gallery Intent Handler Code
// Sample code to call Beryl's async intent launch system to load a bitmap from the gallery.
// It's kinda complicated but it does a lot of stuff in the background for you.
// Just drop this code in whatever Fragment or Activity you want to get picture data from
// and implement acquirePicture() callback method and everything should work.

private static final int ACTIVITYRESULT_CHOOSEPICTURE = 100;

@Override
public void onActivityResult(int requestCode, int resultCode, Intent data) {
  super.onActivityResult(requestCode, resultCode, data);

  IActivityResultHandler handler = null;
  
  // If receiving result from Gallery.
  if(requestCode == ACTIVITYRESULT_CHOOSEPICTURE) {
    handler = new Gallery.GetImageResult() {
    
      // These callbacks are run on the UI thread.
      // They handle the different results of loading the bitmap.
      public void onResultCompleted() {
        if(this.bitmapResult.isAvailable()) {
          acquirePicture(this.bitmapResult.get());
        }
        
        this.bitmapResult = null;
      }

      public void onResultCanceled() {
        this.bitmapResult = null;
      }

      public void onResultCustomCode(int resultCode) {
        this.bitmapResult = null;
      }
    };
  }
  
  if(handler != null) {
    final ActivityResultTask resultTask = 
       new ActivityResultTask(intentLauncher, handler, resultCode, data);
    resultTask.execute();
  }
}

// Request Gallery for a picture.
public void selectPictureFromGallery() {
    if(checkStorageState()) {
      intentLauncher.beginStartActivity(new Gallery.GetImage(), ACTIVITYRESULT_CHOOSEPICTURE);
    }
  }

// Proxy for launching the gallery.
// Needed since we can be launching from a Fragment or an Activity.
final ActivityIntentLauncher.IActivityLauncherProxy launcherProxy = 
  new ActivityIntentLauncher.IActivityLauncherProxy() {
  public Activity getContext() {
    return WorkerFragment.this.getActivity();
  }

  public void startActivityForResult(Intent intent, int requestCode) {
    WorkerFragment.this.startActivityForResult(intent, requestCode);
  }

  public void startActivity(Intent intent) {
    WorkerFragment.this.startActivity(intent);
  }

  public void onStartActivityFailed(Intent intent) {
    WorkerFragment.this.showToast(R.string.nolocal_generic_error);
  }

  public void onStartActivityForResultFailed(Intent intent, int requestCode) {
    WorkerFragment.this.showToast(R.string.nolocal_generic_error);
  }
};

Friday, February 10, 2012

How to Quickly Support Ice Cream Sandwich

Android 4.0 (Ice Cream Sandwich) has been released for a few months now and a lot of apps still don't support it. A quick look at the Platform Versions page reveals only about 5% have Honeycomb or ICS at this time. While that may not be a lot, there's an interesting trend where users with newer versions of Android download more apps.

I personally am in the process of updating all of my apps to ICS and for the most part it's pretty simple. Below are some steps to quickly get the most benefits of ICS in the shortest time possible.

Download the Latest SDKs and Developer Tools
The first thing your should do is make sure your IDE and SDKs are up-to-date.
  1. Open Eclipse
  2. Help > Check for Updates (If ADT has an update install it.)
  3. Window > Android SDK Manager
  4. Check all the newest SDKs and new Android Tools and download them. Screenshot below shows 4.0.3.
Android SDK Manager with 4.0.3 and the latest SDK tools installed. 

Update the Project SDK
  1. Right click the Project folder name in Eclipse and select Properties.
  2. Go to the Android section and check the latest version. This gives you access to the latest APIs. Don't worry you can still target older versions.

Project Properties, Android 4.0.3 selected.
Tip: If you start using the new APIs you'll need to make sure that you don't call them while running on older versions of Android. A great way to do this is to temporarily switch the target SDK version in the project settings to the lowest version. Then check to see if any of the compile errors can be hit on those versions.

Set the Target Versions in the AndroidManifest.xml
Open the AndroidManifest.xml and change the uses-sdk tag to match the version of the SDK you selected. Android 4.0.3 has an API level of 15. The example below shows an app that supports 4.0.3 down to Android 1.6, API level 4.

Changing the sdkTargetVersion to 14 or higher will take you out of compatibility mode. This means certain key features will be turned on. Like the Action Bar replacing the menu button.

Consider Dropping Older Versions
Likewise holding on to older version can be a drag. At this time Android 2.1 is a good minimum version to support for maximum coverage (98%). Supporting Android 2.2 (90%)  as the minimum version is also acceptable too.

Enable Hardware Accelerated Rendering
Android 3.0 introduced hardware accelerated rendering. While this won't make your apps faster, it will make animations smoother. Do this at the application level in the manifest.

Hardware accelerated rendering is awesome but it does have its drawbacks. This is one thing to consider while testing your app. Certain features require more memory or actually draw slower when using 2D-accelerated drawing. If this is the case, you can disable hardware acceleration at the application, activity, and view levels. Check out this article for more information.

Use the New Themes
In general, it's a good idea to have a theme associated with your app even if it's just an alias to the stock theme. This gives you the ability to make minor tweaks to the look and feel. Android 3.0 introduced the Holographic theme, (@android:style/Theme.Holo) This is the standard Android theme going forward and it is a requirement for anyone that has the Android Market to have this theme on their device. To enable it create these XML files.
res/values/themes.xml

  
res/values-v11/themes.xml

  
AndroidManifest.xml

De-Lint your App
The latest release of the ADT introduced Eclipse integration with the android lint tool. This tool is nice for finding bugs and bad practices with your app. A few things it finds is unused resources, over draw performance issues, and even edge case bugs that cause weird crashes on some phones.

To run the tool right click on the Project Folder > Android Tools > Run Lint: Check for Common Errors menu.

The issues will appear as warnings some as errors. Fix the ones of importance. I'd give higher priority over possible crash and performance bugs.

Fix JNI References
This isn't for most developers but if you write native code check out this article. Essentially, Dalvik moves objects around if you're running with a targetSdkVersion="14" or higher. The goal is to improve memory usage. CheckJNI is a tool that has been out for a while that finds bad practices that can cause crashes in ICS. This is a painful process that you'll need to do eventually. Unless you always stuck to the best practices.

Apart from the JNI References, following these steps is the fast track way to support ICS. It should probably take 1-3 days' worth of work to get an ICS apk ready for the market. While most of your user base won't get these enhancements the most important share of your users will. Lastly, don't upload the apk until you've tested it on the versions you support and you feel like it meets the level of quality you want.

Saturday, February 4, 2012

In App Screenshots

One of the new highly touted features in Ice Cream Sandwich is screenshot support. This allows a user to take a snapshot of their screen and send it to anyone. Obviously this is a valuable debugging tool as users can send how an app looked when it did something weird.

It is possible to partially support screenshots within your own app. This is essentially done by getting the content root view of your Activity and rendering it against a Canvas.

The code below does just that. (Source excerpt from the android-beryl library.)
public class Screenshot {
  private final View view;
  /** Create snapshots based on the view and its children. */
  public Screenshot(View root) {
    this.view = root;
  }
  /** Create snapshot handler that captures the root of the whole activity. */
  public Screenshot(Activity activity) {
    final View contentView = activity.findViewById(android.R.id.content);
    this.view = contentView.getRootView();
  }
  /** Take a snapshot of the view. */
  public Bitmap snap() {
    Bitmap bitmap = Bitmap.createBitmap(this.view.getWidth(), this.view.getHeight(), Config.ARGB_8888);
    Canvas canvas = new Canvas(bitmap);
    view.draw(canvas);
    return bitmap;
  }
}

Thursday, February 2, 2012

File Size Matters

People love apps. Especially when they are simple and fast to get what they want done. There's a lot of work that goes into making an app's user experience as seamless as possible. Things ranging from subtle cues to picking sizes of buttons for Mr. Fat Fingers but one topic doesn't seem to get talked about, the file size.

While most users could care less how large an app is, after all they can fit 50,000 songs on their phone. What they care about is how long they have to wait to start using it. It is a critical part of the digital unboxing experience. And you know, everyone loves unboxing videos.

Many apps are downloaded on an impulse. Impulses tend to be short lived. Which means you probably only have seconds to gain the user's attention. The impulse starts before they hit the download button. Which means the time it takes to download the app takes away from the short time someone will be initially interested in your app.

Having bloated apps also have technical disadvantages too. If it's bad enough and you go over the 20MB limit you force users to download over WiFi which is an obstacle. Having resource downloads after the app is installed is preferred but is only acceptable for games.

Fortunately for Android does a lot of work during the compile process to keep package sizes small. There still some steps you can do to make sure that the package size is as small as possible:
  1. Make sure to obfuscate your app with ProGuard. ProGuard removes unused code, makes it faster, and more secure. The SDK now automatically turns this on. Learn the basics of the proguard.cfg file and use it to tighten your code.
  2. Use the Android Lint tool to find resources that are not used.
  3. Use XML shape drawables rather than bitmaps for simple shapes. These also scale very well.
  4. Don't use custom picture backgrounds, most of the time they cause overdraw problems and look ugly anyways.
  5. Use PNGs and use small set of colors for your images. Your app will look cleaner and leaner. Also, the aapt tool can optimize PNGs to 8-bit with palette when possible.
  6. When creating 9-patch drawables, don't apply padding in the png itself. Create a drawable that references the 9-patch and add the padding there.
Of course having a small package size isn't the only thing that's important but it is one of the first things that is, when it comes to the start-to-finish user experience.

Monday, November 28, 2011

Tip: Handling API Keys

If you've ever done work against the Google APIs or some other metered web service you've no doubt come into contact with API keys. These keys usually associate some identity to the product/client using the web service.
A way to manage this is to create string resources for each API key in a resource file called res/values/strings_apikeys.xml. Below is an example of a resource file with API keys for Google Maps and Android Backup service.

Benefits:

  1. Keys can be referenced in other resource files or the AndroidManifest.xml as shown below.
  2. You can setup a key per region using the region qualifiers. Or use any resource qualifiers to have different keys against.

res/values/strings_apikeys.xml

    @string/apikey_google_maps_debug_laptop
    01rg6-jslkjdakljdakldakjldaasdkasjdlaj-NeedARealKey
    01rg6-jkljakljdklajdlas-UseAKeyHere
    01rg6-jlkfsdklfjasfkajs-FakeKey
    AEdPqrEAAAAIu-GetARealBackupKey

Example of Google Maps View using the referenced key. You can then use this template view using the tag in other layouts.
res/layout/mapview.xml


Tuesday, November 22, 2011

Android Ice Cream Sandwich Resources

These files are from the Android 4.0.1 source tree.
This is basically a merge and zip of all the res/ directories from the source code.
Useful for making your apps look like Ice Cream Sandwich stock apps. Have fun!

Download

Monday, November 21, 2011

Download Android Source

First install git 1.7, java 1.6, and python 2.7.
mkdir ~/bin
PATH=~/bin:$PATH
curl https://dl-ssl.google.com/dl/googlesource/git-repo/repo > ~/bin/repo
chmod a+x ~/bin/repo
mkdir androidsource
cd androidsource
repo init -u https://android.googlesource.com/platform/manifest
repo sync
For more details visit: Initializing a Build Environment

Saturday, November 19, 2011

Layout Tip: Spacer in LinearLayout

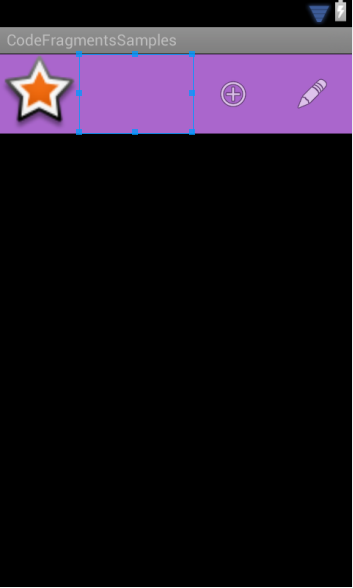
Sometimes you want a layout where you want a spacer view that fills that pushes views to the right of it as far as they can. A common need to do something like this is when you roll your own Action Bar.
The action bar layout with the spacer view highlighted.
XML Layout


Explanation
When working with LinearLayout there's an option to use weights of free space rather than a set amount of space. When the layout measures its children it first sets the fixed sized children. For this layout that's everyone except the spacer view. Then it does another pass to measure the children that will fill dimensions based on their android:layout_weight parameter. Since there's only 1 view with this parameter, it fills up the remaining space.

Source Code
actionbar.xml | Project Page

Sunday, November 6, 2011

Tuning Eclipse for Android Development

The standard IDE for Android development is Eclipse. For the most part, Eclipse has all the tools and goodies I need to get my job done. I'd consider it second to Visual Studio which is pretty good in my opinion. Listed below are some of the things I do in my eclipse environment to tune it better for Android development.


1. Download Eclipse Color Themes plugin
Fastest way to get a clean dark color theme for your source code.
http://www.eclipsecolorthemes.org/
Eclipse Color Theme with Obsidian preference selected.
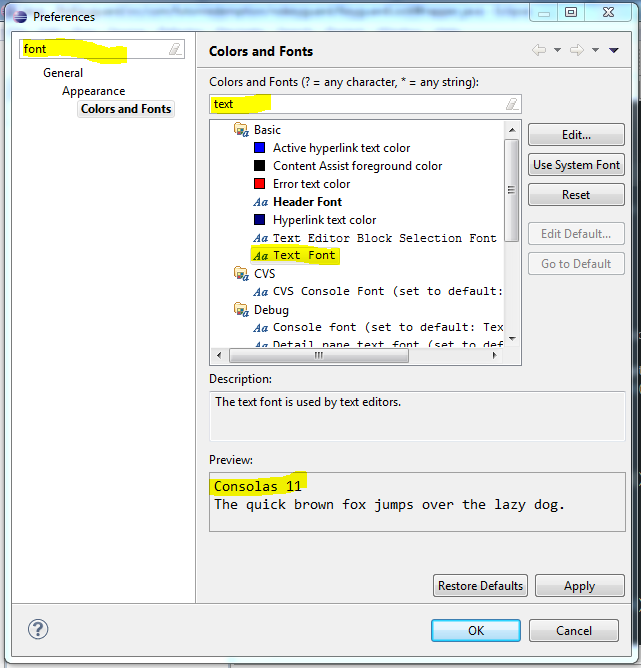
2. Increase the font size
Having big 23" monitors is a must for a developer. Having a big font improves readability, reduces clutter, and is more friendly on the eyes. Especially useful if you don't have 20/20 vision.


3. Associate Android SDK Jars as User Libraries (optional)
Libraries that get updated like the v4 support library will automatically be applied to all projects that include it as a user library instead of a jar within the project itself.
Another advantage is if you're creating a Java (not android) project so that you can export your code as a jar file from eclipse.


4. Associate JAVA_HOME environment variable to a 32-bit JDK
There seems to be subtle problems with Java 64 bit. Rather than dealing with ways to fix them the 32 bit version works fine. Both can co-exist on the same machine without problems.

5. Install Apache ANT (optional)
You might need it right away but having ANT might come in handy later down the road especially if you want to build a library and want a way to automatically package it up or you see a build.xml file somewhere. Download ANT and extract it to the base Android SDK folder.


6. Add Android SDK tools to your PATH environment variable
You'll eventually need access to tools like adb and draw9patch.
[ANDROID SDK DIRECTORY] \tools
[ANDROID SDK DIRECTORY] \platform-tools
[ANDROID SDK DIRECTORY] \apache-ant\bin


Well that's pretty much all the customizations for Eclipse that I use. 

Saturday, November 5, 2011

.hgignore for Android

If you use source control one of the first things you want to do is create an ignore rules file for binaries and auto generated files so they don't pollute check ins with useless changes.
Most developers out there use Mercurial and GIT for source control. Both of these systems are very similar and work fine for any project.

Here's the base .hgignore I've created over the course of making a few Android projects. This version is unique in that it will ignore the directories if your Android projects are placed in the root or in a subdirectory of the repository. It doesn't have that bug where a directory ending in an excluded directory's name also mistakenly get ignored. Like, should remain robin/ but bin/ is ignored.
#Mercurial Ignore Rules for Android
#Save as .hgignore in the repository base directory and add it to source control.
syntax: glob
*.class
*.apk
*.dex
*.ap_
*.suo

syntax: regexp
^(.*[\\/])?gen[\\/].*
^(.*[\\/])?bin[\\/].*
^(.*[\\/])?obj[\\/].*
^(.*[\\/])?log[\\/].*
^(.*[\\/])?obf[\\/].*
^(.*[\\/])?jars[\\/].*
^(.*[\\/])?jar-sources[\\/].*
^(.*[\\/])?javadoc[\\/].*
^(.*[\\/])?\.svn[\\/].*
^(.*[\\/])?\.metadata[\\/].*
^(.*[\\/])?\.settings[\\/].*

Thursday, November 3, 2011

Android Design Templates

Today I was throwing around some app ideas and I always like to draw these ideas out to visualize them. I remembered seeing some templates in the past that you could print out and have the outline of a phone to draw your app in, so I went searching for some Nexus S and Galaxy Tab templates. I didn't really find any, but I did find several other android idea/sketching goodies. In the end, however, I decided to make a custom template with my devices and I am releasing them under a creative commons license for all of you out there to enjoy. If you have suggestions on how to make it better, let me know in the comments.


Tuesday, November 1, 2011

Tip: Naming Resource Files

Android has a lot of resource files. These normally are XML files that have the <resource> root tag. The standard convention is to split resources out by type. The problem with this is these files tend to get very large and become unweildly to edit. A better way to organize them is by adding a category to the file name as well.

For example: strings_preferences.xml would contain all the strings that pertain to preferences while strings_application.xml will pertain to application strings that you might not want to localize.

Layouts sometimes become difficult to determine where they lie in the hierarchy. A good convention is to name layouts that are bound to an activity with the prefix activity_[activity name]. So MainActivity > activity_main.xml. Do this with fragments too: BuddyListFragment > fragment_buddylist.xml.

Sunday, October 30, 2011

How to Add AdMob to Your App

AdMob is a service for developers that provides advertisements for your apps.  If you've used Android for any amount of time, I'm sure you know that many apps are monetized through small ads displayed in the app.  So the question is, how can you get your own piece of the mobile ad pie?  Well, I'm about to tell you.
  1. First you'll need to make sure you've got the latest version of the Android SDK.
  2. Next, you need to download the AdMob SDK.  Inside of the zip file, you'll find a .jar file.  Copy that to the libs folder under your project root.
  3. Now go to your project in Eclipse.  Right click your project in the package explorer and choose refresh to make sure the jar is showing up in your libs folder.
  4. Next we need to add the library to the project.  To do this, right click your project and go to properties.  Then go to "Java Build Path" on the left and then choose the "Libraries" tab.  Now click "Add JARs..." and you should see the GoogleAdMobAdsSdk jar file inside of your project.  Select that and click OK until you're back to the editor.
  5. Next we need to add an AdActivity to our AndroidManifest.xml file.  Put this at the bottom of the application section, just before </application>.
    <activity android:name="com.google.ads.AdActivity"
    android:configChanges="keyboard|keyboardHidden|orientation|screenLayout|uiMode|screenSize|smallestScreenSize"/>
  6. You also need to set the permissions to access the Internet and the Network State.  Obviously, these are required to download the ads.  This should be pasted at the end of your AndroidManifest.xml right before the </manifest> tag.
    <uses-permission android:name="android.permission.INTERNET"/>
    <uses-permission android:name="android.permission.ACCESS_NETWORK_STATE"/>
  7. Now it's time to add the ad to your application.  The library we included comes with a new view called an AdView.  Let's add this to our layout through XML.  Open the main layout xml file for your project.  In this example, we'll use a linear layout.  We'll begin by adding the namespace (the xmlns:ads="http://..." part) to the LinearLayout as shown below.
    <LinearLayout android:id="@+id/linearLayout1"
            android:orientation="vertical"
            android:background="#FFFFFF"
            android:layout_height="fill_parent"
            android:layout_width="fill_parent"
            xmlns:android="http://schemas.android.com/apk/res/android"
            xmlns:ads="http://schemas.android.com/apk/lib/com.google.ads">
  8. Now go to the bottom of the LinearLayout and add the AdView code shown below.  Remeber to insert your publisher id into the adUnitId field.
    
    
  9. The last tricky part is to use wrap_content for your ad height and then set the main view element to a height of 0px and weight of 1.  This will make the AdView size to the banner ad size and then will allow your main content to take up the remaining space.  In my project, I had a linear layout that was set to fill_parent.  Inside of that I had a fragment with a height of 0px and weight of 1 followed by the AdView with a height of wrap_content.
That's it!  You should now be well on your way to becoming a mobile app mogul.
One thing to look out for for those of you that are running a custom mod on your phone is the etc/hosts file.  Many mods include a list of ad domains that are blocked through the hosts file.  This is great if you don't like seeing ads, but can be a problem when it comes time to test ads in your app.  I used notepad++ and a find/replace with a regular expression like the one below.
Find:
(.*admob.*)
Replace:
# \1
This will comment out all of the admob lines.  I also did it with a search for google instead of admob.

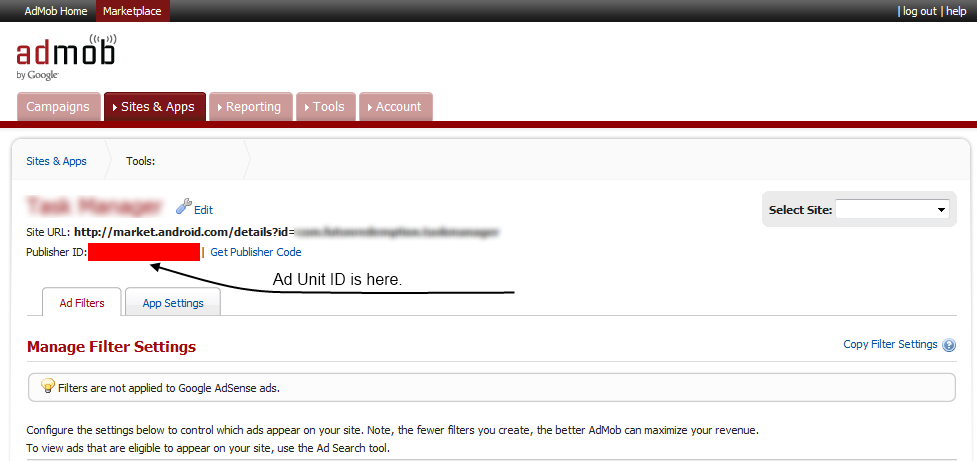
To get your admob ad unit id go to your admob account and click on Sites & Apps and then click the manage button underneath the app you are working with. You'll see the Publisher ID for the app on the details page. This is the Ad Unit ID.


Admob Administration page for an app.

Tuesday, October 25, 2011

Tip: Choosing a Color Palette/Theme

Many Android apps out there don't look that well. While it's not impossible to make a great looking app. It's difficult if you're a lone developer with little designer skills. 


A big reason why developers (without design sense) make poor looking apps is because it's difficult to get a consistent color theme. In short, developers suck at picking colors. This shouldn't discourage you though. A great way to overcome this problem is to have other people that are good at picking colors do it for you, for free.


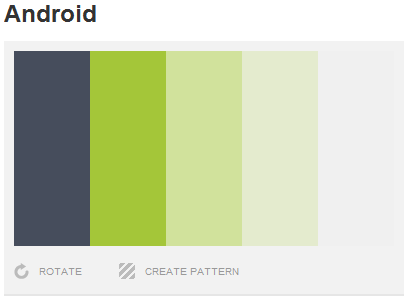
There's a site called Colour Lovers which has been indispensable as a tool for finding a good color themes. Try to stick with a clean palette of 3-5 colors (+ black and white) and use only those colors throughout the application.


Of course you'll want to tag these colors as color resources in your app.

http://www.colourlovers.com/


Android Color Palette (http://www.colourlovers.com/palette/1392493/Android)


res/colors_palette.xml

    #ff464D5C
    #ffA4C639
    #ffD1E29C
    #ffE4EBCE
    #ffF0F0F0


Of course when referencing color resources in xml use the @color/name syntax.

Monday, October 24, 2011

Android Asset Studio

A lot of Android developers don't have designers working with them to make their apps look as great as they're built. Following the Android User Interface Guidelines is important to make an app feel like it fits in naturally with the rest of the OS. A great tool to help with this is the Android Asset Studio.


Asset Studio takes basic vector shapes, clip art, and so on and makes icon resources that follow the guidelines. It works pretty well and is being actively developed by Google engineers.


It supports Launcher, Menu, Action Bar, Tab and Notification icons as well as placing screenshots into phone frames.


Asset Studio - Launcher Icon Generator
UPDATE: Some of these features made their way into the Android Eclipse plugin. The web app still have more features in it though. You can access it by right clicking your project in the Package Explorer view's and selecting New -> Other. Then drill down to Android Icon Set. 


Sunday, October 23, 2011

Creating Activities for Tablets and Phones

Most apps start with the launcher icon. Activities that are specified with the following intent-filter will have a launcher icon for them.


There's a lot of Android hardware out there. The most notable form factors are phones and tablets. In Android 3.0 Fragments were introduced as a solution to compartmentalize logic so that it can be easier to share between phones and tablets. Fragments are great but having 1 Activity to work with phones and tablets is difficult to maintain.


The cleanest solution is to have separate activities for phones and tablets and use bool resources to tell Android which activity to use. Notice that the booleans are true based where they are stored, we assume phones but xlarge displays usually indicate tablets. Then in the AndroidManifest.xml we have the 2 activities declared where the android:enabled is based on which mode the app is going to run in.


This solution isn't limited to Tablets vs Phones. You can basically create conditionals as the resource folder qualifiers allow.


res/values/bools_hardware.xml

    true
    false
res/values-xlarge/bools_hardware.xml

    false
    true

AndroidManifest.xml


Android Starter Kit Part 1

I have a year of Android development experience. Which in framework years means I’m old enough climb up on the kitchen counter, take mom’s keys out of the cookie jar and buy over-the-counter whiteout.

Android, like any platform, has a learning curve. There are so many things to learn it can be overwhelming. Android’s main classes are probably the hardest to understand. Once you get over this hump it’s smooth sailing and there’s a constant draft.

Through experience grinding, I’ve found some tips that make everything a lot easier. Some of these were surprising. And others are fun. Below I compiled an Android Starter Kit. I made it from items dropped by Exceptions.


0. Take a Coffee Break (If you need it)
Java is the language you’ll be using in Android. You have to know it. Get some beans before you proceed any further. C#ers take note, Java is similar to C#. In fact, I learned C# by writing Java code in Visual Studio and fixing the compile errors.

1. Learn the Basics of Your Environment
Go to developer.android.com download all the goodies. Install, configure, setup your virtual device etc.

Create and launch the virtual device (AVD). I recommend using the latest Android version with the Google API for now. It’s the fastest. The AVD takes a long time to boot. So if you have OCD then go outside for a walk.

Lastly, leave all the acronyms you learned in school on the floor for a while, well except OOP. You’re code is going to be garbage and it had better be garbage. Focus on learning not perfection. Who says patterns make perfect anyway?

2. Get a REAL Android phone
Notice I didn’t say “device.” Get a phone, with or without contract with “stock firmware.” It’s important that you get real hardware because certain things don’t work in the emulator. For professionals, get at least 2. Both phones should be as opposite as possible. There’s so many of them out there and you can probably find one before your AVD finishes booting up. Here’s to REAL multiasking! And remember the best apps can only be written using the best hardware.

3. Plug in and Charge Up!
One of the great things about Android it it has a very healthy development community. There’s a ton of resources out there to help. Use these to start you off.
- Google Account - You should have one if you have an Android phone. If not create one through Gmail you’ll need it to register with the Android Market. www.gmail.com
- Stack Overflow - You’ll have questions. They’ve already been answered here. If they haven’t ask it and it’ll be answered in day at the most. www.stackoverflow.com
- Blogs - Keep a list of blogs that post code. These will give you ideas and provide insight that you never thought about. http://android-developers.blogspot.com is the official Android Development blog.

4. Tune In

A picture is worth a thousand words and that’s a lot to take in on one bite. You could choke. Those crazy diagrams and schematics are explained by Android Engineers on YouTube. What’s great about this is that they go a bit further and explain things that you should be aware of. Like: Why does an Activity get killed when the screen rotates? Good luck reading about that. I saw someone explain it to me in motion and I leveled up.

YouTube Channels:
AndroidDevelopers - http://www.youtube.com/user/androiddevelopers
GoogleDevelopers - http://www.youtube.com/user/googledevelopers
Oh and watch all the Google IO videos about Mobile and Android - http://code.google.com/events/io

Watching the videos takes a long time. Watch them at a leisurely pace. I suggest watching the important ones that are most relevant to you at the time and make room for the others as you have time.


At this point there’s plenty to do. Remember, don’t focus on code. Try to understand the concepts and how things work with Androids. Even if you know Java. Also be on the look out for classes the rhyme with Intent and Activity.

How to use ActionBar Sherlock

Note: ActionBarSherlock has changed significantly since the time of this posting. We will update this post as soon as we can, but in the mean time, please refer to the official documentation at http://actionbarsherlock.com/usage.html


  The Android ActionBar is a new widget that replaces the title bar, provides a location for menus and buttons, and provides a source of commonality between Android apps. The Action Bar is included by default in all activities that target Android 3.0 or greater, but in order to get the same effect in earlier versions of android, you were stuck writing a custom solution. ActionBar Sherlock is a nice library that allows you to solve this problem by letting you add ActionBars to your apps all the way back to Android 1.6. When used on Honeycomb and later it uses the default Android classes but on earlier versions it provides a custom replacement that still maintains compatibility with the newer API.

Here's a run down on how to add the library to your project. Note that since ActionBar Sherlock is an extension of the compatibility support library, you should remove the combatibility support jar if you were using it before since it is included with ActionBar Sherlock.

  1. Download the .zip/.tgz and extract it somewhere 
  2. Go to eclipse and choose File->New->Project 
  3. Choose Android Project 
  4. Select Create project from existing source and then browse to the library folder inside the folder you just extracted the .zip/.tgz into 
  5. Build Target should be the latest, but your minSdkVersion can be less 
  6. Finish the wizard, then right click on the newly created project and go to properties 
  7. Under the Android heading, you should see a section for Library with a checkbox IsLibrary. Make sure that's checked. 
  8. Now go to the properties for your Android project, then under the Android heading and the Library section choose Add... 
  9. You should see the actionbarsherlock library, add this to your project 
  10. Lastly, if you were using the compatibility support, you need to delete that jar since it's included in ActionBarSherlock After you have added the library to your project, you will need to take some additional steps to ensure it is being used.

1. Add a theme to your application in the AndroidManifest.xml

<application android:icon="@drawable/ic_launcher" android:label="@string/app_name"
 android:theme="@style/Theme.Sherlock">


2. Make sure that your activity extends FragmentActivity

public class AbbreviationsActivity extends FragmentActivity {


Now you're done! If you want to interact with your ActionBar through Java, make sure you use getSupportActionBar() instead of the standard getActionBar() to get the ActionBar Sherlock version of the action bar. The ActionBar Sherlock website along with the Android docs has information about theming, adding menus and buttons, and changing text and icons. Enjoy!