Saturday, November 19, 2011

Layout Tip: Spacer in LinearLayout

Sometimes you want a layout where you want a spacer view that fills that pushes views to the right of it as far as they can. A common need to do something like this is when you roll your own Action Bar.
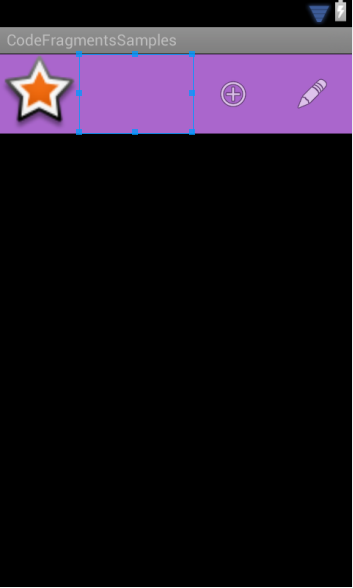
The action bar layout with the spacer view highlighted.
XML Layout


Explanation
When working with LinearLayout there's an option to use weights of free space rather than a set amount of space. When the layout measures its children it first sets the fixed sized children. For this layout that's everyone except the spacer view. Then it does another pass to measure the children that will fill dimensions based on their android:layout_weight parameter. Since there's only 1 view with this parameter, it fills up the remaining space.

Source Code
actionbar.xml | Project Page

Sunday, November 6, 2011

Tuning Eclipse for Android Development

The standard IDE for Android development is Eclipse. For the most part, Eclipse has all the tools and goodies I need to get my job done. I'd consider it second to Visual Studio which is pretty good in my opinion. Listed below are some of the things I do in my eclipse environment to tune it better for Android development.


1. Download Eclipse Color Themes plugin
Fastest way to get a clean dark color theme for your source code.
http://www.eclipsecolorthemes.org/
Eclipse Color Theme with Obsidian preference selected.
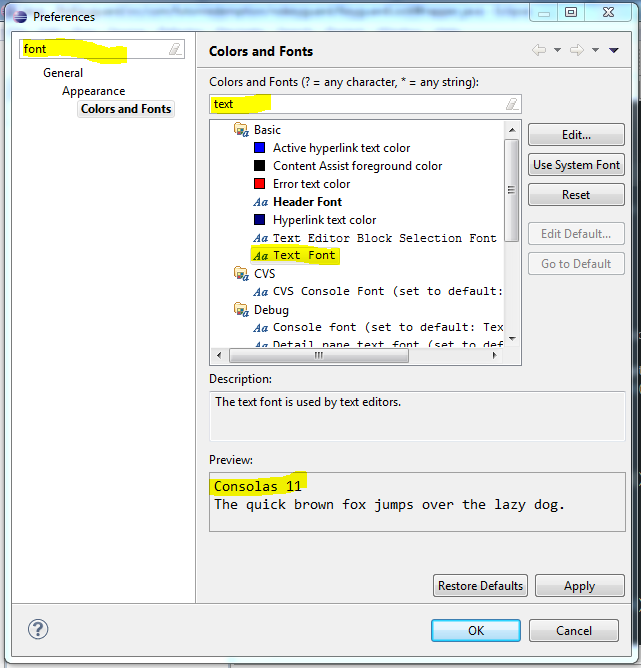
2. Increase the font size
Having big 23" monitors is a must for a developer. Having a big font improves readability, reduces clutter, and is more friendly on the eyes. Especially useful if you don't have 20/20 vision.


3. Associate Android SDK Jars as User Libraries (optional)
Libraries that get updated like the v4 support library will automatically be applied to all projects that include it as a user library instead of a jar within the project itself.
Another advantage is if you're creating a Java (not android) project so that you can export your code as a jar file from eclipse.


4. Associate JAVA_HOME environment variable to a 32-bit JDK
There seems to be subtle problems with Java 64 bit. Rather than dealing with ways to fix them the 32 bit version works fine. Both can co-exist on the same machine without problems.

5. Install Apache ANT (optional)
You might need it right away but having ANT might come in handy later down the road especially if you want to build a library and want a way to automatically package it up or you see a build.xml file somewhere. Download ANT and extract it to the base Android SDK folder.


6. Add Android SDK tools to your PATH environment variable
You'll eventually need access to tools like adb and draw9patch.
[ANDROID SDK DIRECTORY] \tools
[ANDROID SDK DIRECTORY] \platform-tools
[ANDROID SDK DIRECTORY] \apache-ant\bin


Well that's pretty much all the customizations for Eclipse that I use. 

Saturday, November 5, 2011

.hgignore for Android

If you use source control one of the first things you want to do is create an ignore rules file for binaries and auto generated files so they don't pollute check ins with useless changes.
Most developers out there use Mercurial and GIT for source control. Both of these systems are very similar and work fine for any project.

Here's the base .hgignore I've created over the course of making a few Android projects. This version is unique in that it will ignore the directories if your Android projects are placed in the root or in a subdirectory of the repository. It doesn't have that bug where a directory ending in an excluded directory's name also mistakenly get ignored. Like, should remain robin/ but bin/ is ignored.
#Mercurial Ignore Rules for Android
#Save as .hgignore in the repository base directory and add it to source control.
syntax: glob
*.class
*.apk
*.dex
*.ap_
*.suo

syntax: regexp
^(.*[\\/])?gen[\\/].*
^(.*[\\/])?bin[\\/].*
^(.*[\\/])?obj[\\/].*
^(.*[\\/])?log[\\/].*
^(.*[\\/])?obf[\\/].*
^(.*[\\/])?jars[\\/].*
^(.*[\\/])?jar-sources[\\/].*
^(.*[\\/])?javadoc[\\/].*
^(.*[\\/])?\.svn[\\/].*
^(.*[\\/])?\.metadata[\\/].*
^(.*[\\/])?\.settings[\\/].*

Thursday, November 3, 2011

Android Design Templates

Today I was throwing around some app ideas and I always like to draw these ideas out to visualize them. I remembered seeing some templates in the past that you could print out and have the outline of a phone to draw your app in, so I went searching for some Nexus S and Galaxy Tab templates. I didn't really find any, but I did find several other android idea/sketching goodies. In the end, however, I decided to make a custom template with my devices and I am releasing them under a creative commons license for all of you out there to enjoy. If you have suggestions on how to make it better, let me know in the comments.


Tuesday, November 1, 2011

Tip: Naming Resource Files

Android has a lot of resource files. These normally are XML files that have the <resource> root tag. The standard convention is to split resources out by type. The problem with this is these files tend to get very large and become unweildly to edit. A better way to organize them is by adding a category to the file name as well.

For example: strings_preferences.xml would contain all the strings that pertain to preferences while strings_application.xml will pertain to application strings that you might not want to localize.

Layouts sometimes become difficult to determine where they lie in the hierarchy. A good convention is to name layouts that are bound to an activity with the prefix activity_[activity name]. So MainActivity > activity_main.xml. Do this with fragments too: BuddyListFragment > fragment_buddylist.xml.

Sunday, October 30, 2011

How to Add AdMob to Your App

AdMob is a service for developers that provides advertisements for your apps.  If you've used Android for any amount of time, I'm sure you know that many apps are monetized through small ads displayed in the app.  So the question is, how can you get your own piece of the mobile ad pie?  Well, I'm about to tell you.
  1. First you'll need to make sure you've got the latest version of the Android SDK.
  2. Next, you need to download the AdMob SDK.  Inside of the zip file, you'll find a .jar file.  Copy that to the libs folder under your project root.
  3. Now go to your project in Eclipse.  Right click your project in the package explorer and choose refresh to make sure the jar is showing up in your libs folder.
  4. Next we need to add the library to the project.  To do this, right click your project and go to properties.  Then go to "Java Build Path" on the left and then choose the "Libraries" tab.  Now click "Add JARs..." and you should see the GoogleAdMobAdsSdk jar file inside of your project.  Select that and click OK until you're back to the editor.
  5. Next we need to add an AdActivity to our AndroidManifest.xml file.  Put this at the bottom of the application section, just before </application>.
    <activity android:name="com.google.ads.AdActivity"
    android:configChanges="keyboard|keyboardHidden|orientation|screenLayout|uiMode|screenSize|smallestScreenSize"/>
  6. You also need to set the permissions to access the Internet and the Network State.  Obviously, these are required to download the ads.  This should be pasted at the end of your AndroidManifest.xml right before the </manifest> tag.
    <uses-permission android:name="android.permission.INTERNET"/>
    <uses-permission android:name="android.permission.ACCESS_NETWORK_STATE"/>
  7. Now it's time to add the ad to your application.  The library we included comes with a new view called an AdView.  Let's add this to our layout through XML.  Open the main layout xml file for your project.  In this example, we'll use a linear layout.  We'll begin by adding the namespace (the xmlns:ads="http://..." part) to the LinearLayout as shown below.
    <LinearLayout android:id="@+id/linearLayout1"
            android:orientation="vertical"
            android:background="#FFFFFF"
            android:layout_height="fill_parent"
            android:layout_width="fill_parent"
            xmlns:android="http://schemas.android.com/apk/res/android"
            xmlns:ads="http://schemas.android.com/apk/lib/com.google.ads">
  8. Now go to the bottom of the LinearLayout and add the AdView code shown below.  Remeber to insert your publisher id into the adUnitId field.
    
    
  9. The last tricky part is to use wrap_content for your ad height and then set the main view element to a height of 0px and weight of 1.  This will make the AdView size to the banner ad size and then will allow your main content to take up the remaining space.  In my project, I had a linear layout that was set to fill_parent.  Inside of that I had a fragment with a height of 0px and weight of 1 followed by the AdView with a height of wrap_content.
That's it!  You should now be well on your way to becoming a mobile app mogul.
One thing to look out for for those of you that are running a custom mod on your phone is the etc/hosts file.  Many mods include a list of ad domains that are blocked through the hosts file.  This is great if you don't like seeing ads, but can be a problem when it comes time to test ads in your app.  I used notepad++ and a find/replace with a regular expression like the one below.
Find:
(.*admob.*)
Replace:
# \1
This will comment out all of the admob lines.  I also did it with a search for google instead of admob.

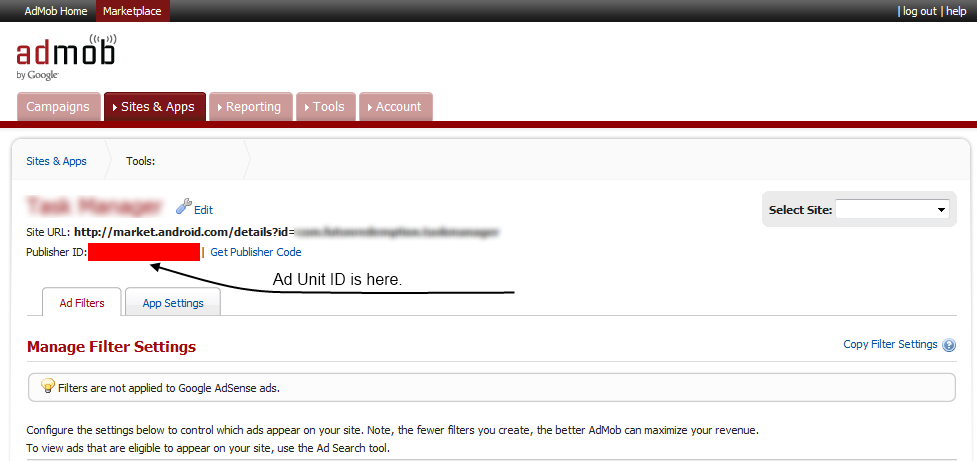
To get your admob ad unit id go to your admob account and click on Sites & Apps and then click the manage button underneath the app you are working with. You'll see the Publisher ID for the app on the details page. This is the Ad Unit ID.


Admob Administration page for an app.

Tuesday, October 25, 2011

Tip: Choosing a Color Palette/Theme

Many Android apps out there don't look that well. While it's not impossible to make a great looking app. It's difficult if you're a lone developer with little designer skills. 


A big reason why developers (without design sense) make poor looking apps is because it's difficult to get a consistent color theme. In short, developers suck at picking colors. This shouldn't discourage you though. A great way to overcome this problem is to have other people that are good at picking colors do it for you, for free.


There's a site called Colour Lovers which has been indispensable as a tool for finding a good color themes. Try to stick with a clean palette of 3-5 colors (+ black and white) and use only those colors throughout the application.


Of course you'll want to tag these colors as color resources in your app.

http://www.colourlovers.com/


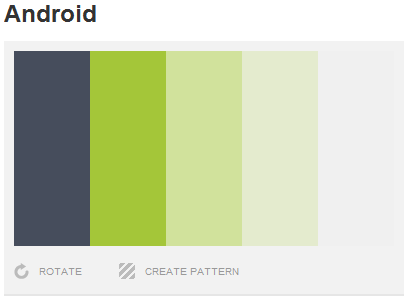
Android Color Palette (http://www.colourlovers.com/palette/1392493/Android)


res/colors_palette.xml

    #ff464D5C
    #ffA4C639
    #ffD1E29C
    #ffE4EBCE
    #ffF0F0F0


Of course when referencing color resources in xml use the @color/name syntax.